Office 2021专业增强版

Office 2021有专业增强版、Office家庭和学生版、专业版等多个版本,Office 2021家庭版本包含Word、Excel、PowerPoint以及OneNote日常生必不可少的程序;而专业增强版和专业版包含Access、Excel、OneNote、Outlook、PowerPoint、Publisher、Skype以及Word。所以在下载的时候,自己要知道需要哪些软件,用不到Access、Outlook、Publisher这些应用的用户安装家庭学生版即可,需要用到的用户就安装专业增强版!下面Office中文网给大家整理下Office 2021专业增强版的全球各种语言的安装包下载链接。

Office 2021专业增强版多种语言安装包下载

  • 软件语言:日语版本
  • 下载链接:https://officecdn.microsoft.com/db/492350f6-3a01-4f97-b9c0-c7c6ddf67d60/media/ja-jp/ProPlus2021Retail.img
  • 立即下载
  • 软件语言:韩文版本
  • 下载链接:https://officecdn.microsoft.com/db/492350f6-3a01-4f97-b9c0-c7c6ddf67d60/media/ko-kr/ProPlus2021Retail.img
  • 立即下载
  • 软件语言:法语版本
  • 下载链接:https://officecdn.microsoft.com/db/492350f6-3a01-4f97-b9c0-c7c6ddf67d60/media/fr-fr/ProPlus2021Retail.img
  • 立即下载
  • 软件语言:芬兰语
  • 下载链接:https://officecdn.microsoft.com/db/492350f6-3a01-4f97-b9c0-c7c6ddf67d60/media/fi-fi/ProPlus2021Retail.img
  • 立即下载
  • 软件语言:德语版本
  • 下载链接:https://officecdn.microsoft.com/db/492350f6-3a01-4f97-b9c0-c7c6ddf67d60/media/de-de/ProPlus2021Retail.img
  • 立即下载

Office 2021 新特性

大为改善的操作界面:
Office 2021 对操作界面作出了极大的改进,将0ffice2021文件打开起始时的3D带状图像取消了,增加了大片的单一的图像。0ffice2021 的改善并仅做了一些浅表的工作。其中的“文件选项卡”已经是一种的新的面貌,用户们操作起来更加高效。例如,当用户想创建一个新的文档,他就能看到许多可用模板的预览图像。

PDF文档完全编辑:
PDF 文档实在令人头疼,说它令人头疼是因为这种文档在工作中使用有诸多不便。即使用户想从PDF文档中截取一些格式化或非格式化的文本都令人抓狂。不过有新版的Office2021套件,这种问题将不再是问题了。套件中的Word能够打开PDF类型的文件,并且用户能够随心所欲地对其进行编辑。可以以PDF文件保存修改之后的结果或者以Word支持的任何文件类型进行保存。

自动创建书签:
这是一项Microsoft Office的新功能,对于那些与篇幅巨大的Word文档打交道,这无疑会提高他们的工作效率。用户可以直接定位到上一-次工作或者浏览的页面,无需拖动“滚动条”。

内置图像搜索功能:
在网络上搜索出图片然后插入到PowerPoint演示文稿中并不轻松。Microsoft也考虑到了用户这方面的需求,用户只需在Office 2021中就能使用必应搜索找到合适的图片,然后将其插入到任何Office文档中。

Excel快速分析工具:
对于大多数用户而言,用好的方法来分析数据和呈现出数据一直是一个令人头疼的问题。0ffice2021 有了Excel 快速分析工具,这问题就变得简单多了,用户输入数据后,Excel 将会提供一些建议来更好地格式化、分析以及呈现出数据等等。即使是一些资深Excel用户都会非常喜欢这一功能。


HEU.KMS.Activator_24.6.5

简单云服务器部署开源短链工具-YOURLS

YOURLS是一款使用PHP+Mysql开发的短链接程序,相比公共短网址好处是数据掌握在自己手中,可控性更高。开源地址:https://github.com/YOURLS/YOURLS

前期准备

window系统推荐phpStudy等集成PHP环境

linux系统:LNMP(Linux+Nginx+Mysql+PHP)环境

域名,如果服务器在国内,则需要备案,笔者使用二级域名http://sd.laihp.top/admin

部署

YOURLS 的安装流程类似于PHP站点。

将安装包解压并上传至服务器; 将 user/config-sample.php 重命名为 user/config.php; 编辑 user/config.php 文件,填入数据库信息和配置站点选项; 访问 http://yoursite.com/admin/ 开始使用吧!

下载YOURLS

YOURLS免费开源,可以在Github下载最新版本(https://github.com/YOURLS/YOURLS/releases),解压后放到站点根目录,并将config-sample.php更名为config.php。

wget https://github.com/YOURLS/YOURLS/archive/refs/tags/1.8.2.tar.gz

配置MySQL数据库

需要先新建一个MySQL数据库,并设置好账号、密码,然后修改user/config.php配置文件,填写正确的MySQL信息,配置信息如下。

修改数据库配置

修改 user/config.php
​
//配置数据库
define( 'YOURLS_DB_USER', 'your db user name' );
define( 'YOURLS_DB_PASS', 'your db password' );
define( 'YOURLS_DB_NAME', 'yourls' );
define( 'YOURLS_DB_HOST', 'localhost' );
define( 'YOURLS_DB_PREFIX', 'yourls_' );
​
//设置你的域名
define( 'YOURLS_SITE', 'http://y.xgss.net' );
​
//设置用户名和密码
$yourls_user_passwords = [
    'admin' => '123456', // 设置好密码
];

输入管理员账号密码登录后如果出现“Could not auto-encrypt passwords. Error was: “cannot write file”.”报错,请将user/config.php文件的权限改为666,然后刷新网页,再把权限改回644,因为你刚才填写密码时用的是明文,这样很危险,所以程序需要对其加密。


安装:http://sd.laihp.top/admin/install.php

登录:http://sd.laihp.top/admin


https://cloud.tencent.com/developer/article/2076770

nginx遍历目录

添加:autoindex on;
server
{
    listen 80;
    server_name myfile.bolevpn.com;
    autoindex on;
    index index.php index.html index.htm default.php default.htm default.html;
    root /mnt/soft;

    #SSL-START SSL相关配置,请勿删除或修改下一行带注释的404规则
    #error_page 404/404.html;
    #SSL-END

    #ERROR-PAGE-START  错误页配置,可以注释、删除或修改
    #error_page 404 /404.html;
    #error_page 502 /502.html;
    #ERROR-PAGE-END

    #PHP-INFO-START  PHP引用配置,可以注释或修改
    include enable-php-74.conf;
    #PHP-INFO-END

    #REWRITE-START URL重写规则引用,修改后将导致面板设置的伪静态规则失效
    include /www/server/panel/vhost/rewrite/myfile.bolevpn.com.conf;
    #REWRITE-END

    #禁止访问的文件或目录
    location ~ ^/(\.user.ini|\.htaccess|\.git|\.env|\.svn|\.project|LICENSE|README.md)
    {
        return 404;
    }

    #一键申请SSL证书验证目录相关设置
    location ~ \.well-known{
        allow all;
    }

    #禁止在证书验证目录放入敏感文件
    if ( $uri ~ "^/\.well-known/.*\.(php|jsp|py|js|css|lua|ts|go|zip|tar\.gz|rar|7z|sql|bak)$" ) {
        return 403;
    }

    location ~ .*\.(gif|jpg|jpeg|png|bmp|swf)$
    {
        expires      30d;
        error_log /dev/null;
        access_log /dev/null;
    }

    location ~ .*\.(js|css)?$
    {
        expires      12h;
        error_log /dev/null;
        access_log /dev/null;
    }
    access_log  /www/wwwlogs/myfile.bolevpn.com.log;
    error_log  /www/wwwlogs/myfile.bolevpn.com.error.log;
}


Mac 使用tcping命令测延时

首先前往Github下载该项目最新的release  (或直接从本站下载:tcping

值得一提的是,该项目的tcping比brew 安装的那个功能更全面,多了测速功能,brew 安装的只能用于检测端口是否打开,根本没啥作用。。

解压之后,安装一下:

➜  mv tcping /usr/local/bin/

然后看一下使用说明:

➜ tcping
tcping is a ping over tcp connection.

Examples:
    1. ping over tcp with custom port 10 times
       > tcping www.baidu.com 80
    2. ping over tcp with custom port 5 times
       > tcping -c 5 www.baidu.com 443

USAGE: tcping [--count <count>] <ip> <port>

ARGUMENTS:
  <ip>                    The IP or Domain to tcping.
  <port>                  The port to tcping.

OPTIONS:
  -c, --count <count>     The number of times to repeat 'tcping'. Default value is 10, Max value is 65535
  -h, --help              Show help information.
➜ tcping -c 5 baidu.com 443
baidu.com:443 has address: 220.181.38.148:443 - Connected - 32.682ms
baidu.com:443 has address: 220.181.38.148:443 - Connected - 29.372ms
baidu.com:443 has address: 39.156.69.79:443 - Connected - 52.232ms
baidu.com:443 has address: 220.181.38.148:443 - Connected - 28.922ms
baidu.com:443 has address: 220.181.38.148:443 - Connected - 28.975ms
Ping statistics baidu.com:443
    5 probes sent.
    5 successful, 0 failed.
Approximate trip times:
    Minimum = 28.922ms, Maximum = 52.232ms, Average = 34.437ms
➜  bin tcping -c 5 220.181.38.148 443
220.181.38.148:443 - Connected - 30.635ms
220.181.38.148:443 - Connected - 30.816ms
220.181.38.148:443 - Connected - 28.708ms
220.181.38.148:443 - Connected - 30.713ms
220.181.38.148:443 - Connected - 34.641ms
Ping statistics 220.181.38.148:443
    5 probes sent.
    5 successful, 0 failed.
Approximate trip times:
    Minimum = 28.708ms, Maximum = 34.641ms, Average = 31.103ms

链接:https://www.jianshu.com/p/b6ba38cd5e70
来源:简书

Windows server SNMP启动与配置

  • SNMP启动

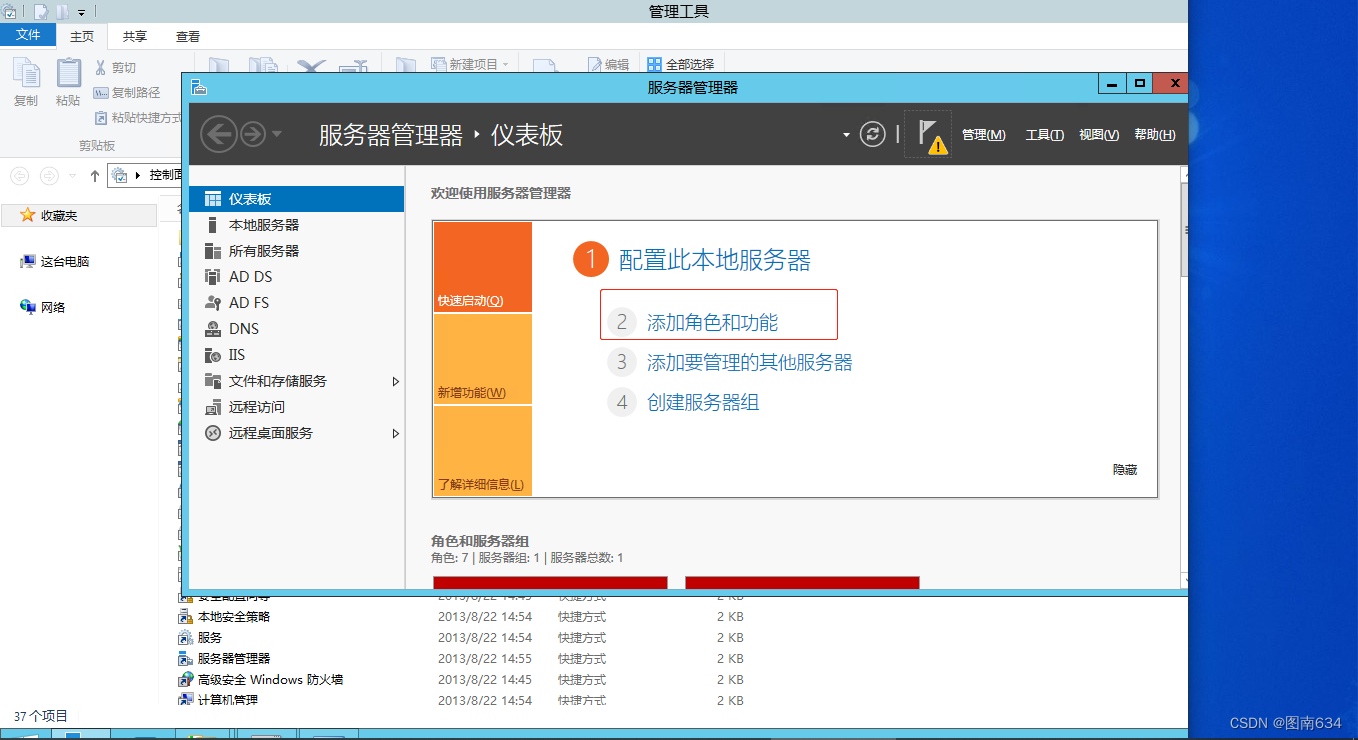
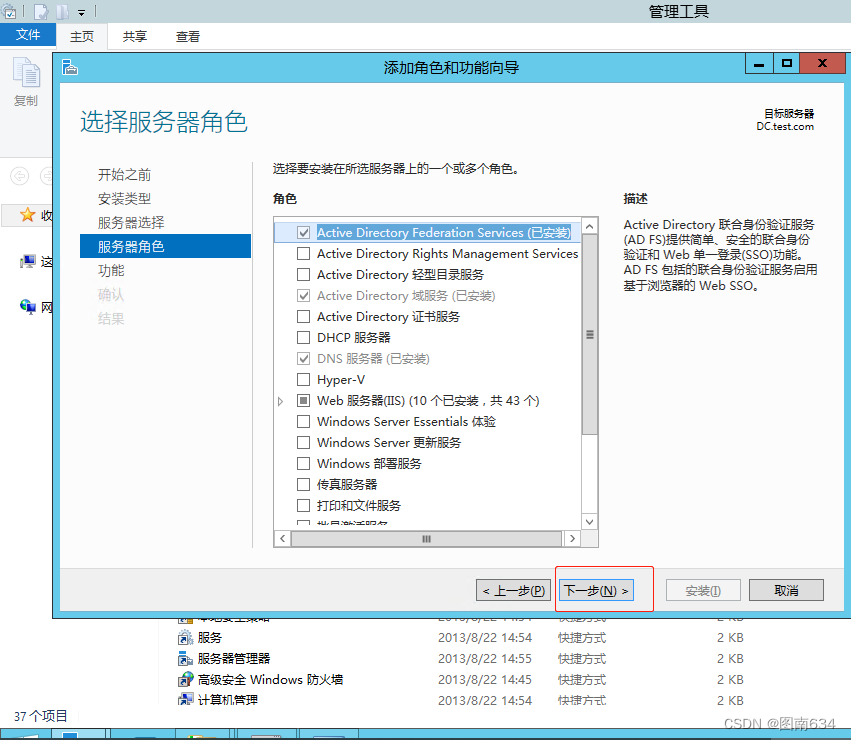
1、首先找到服务器管理器。

2、点击添加角色和功能。

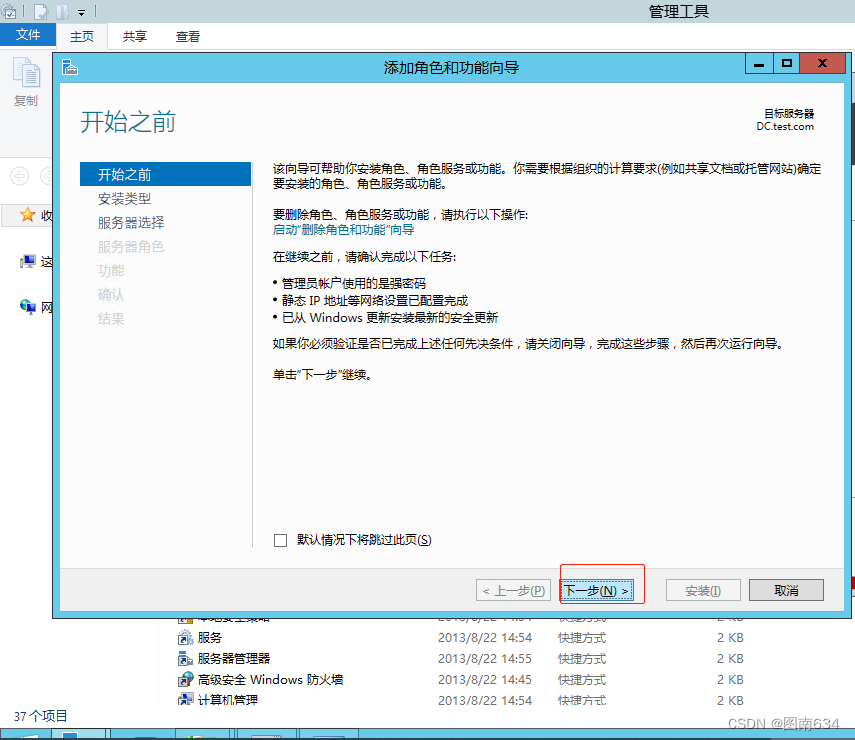
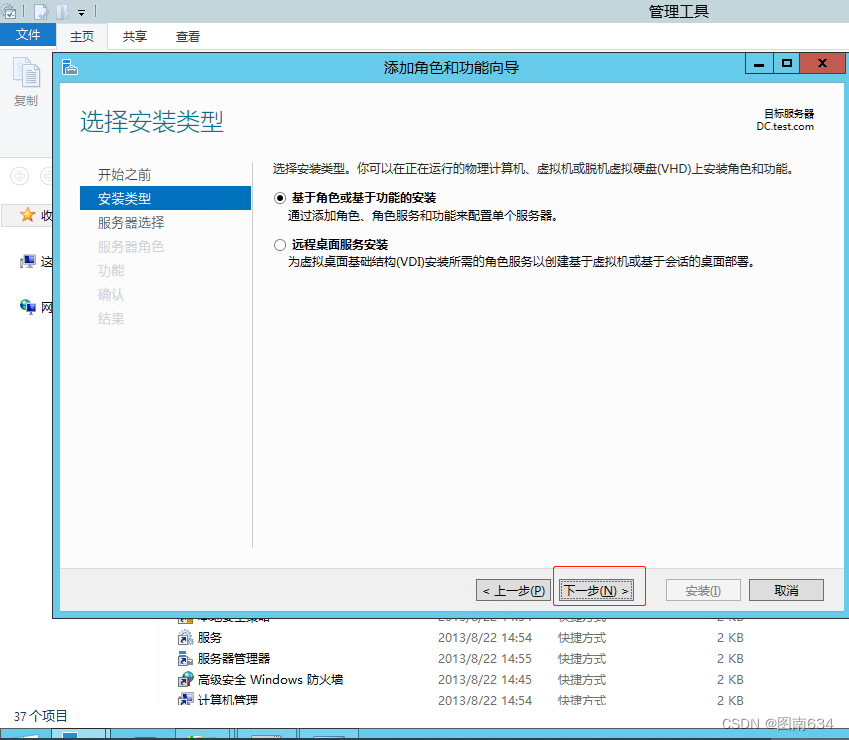
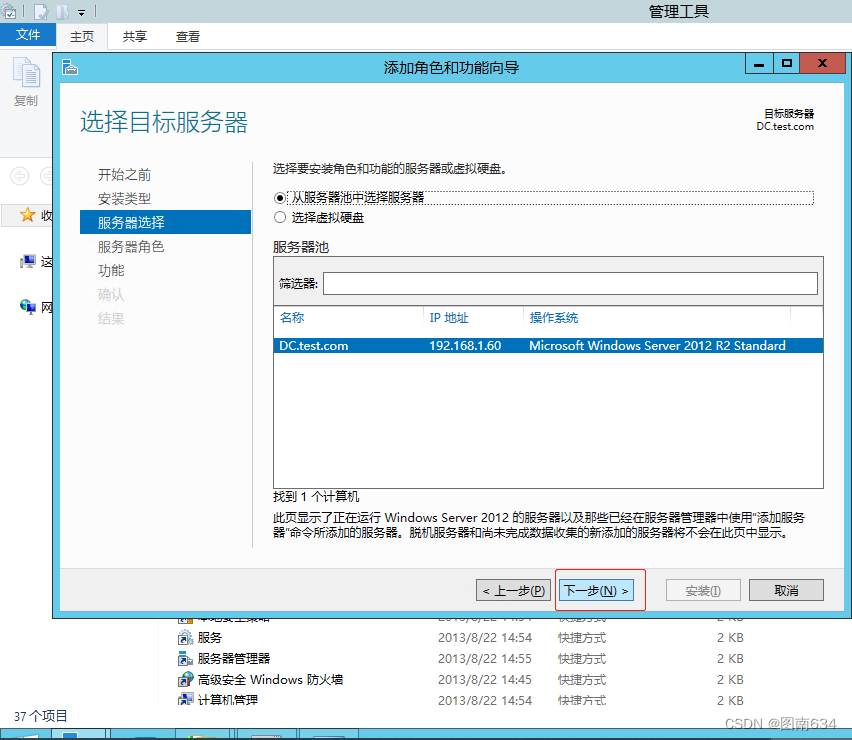
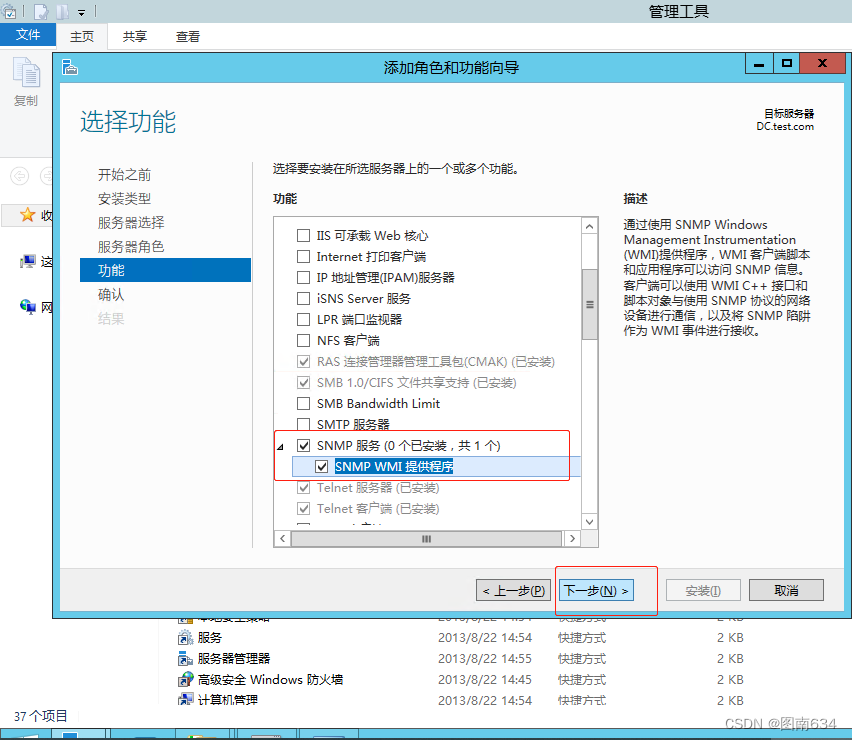
3、 依次点击下一步到功能选项为止,勾选SNMP服务,点击下一步。

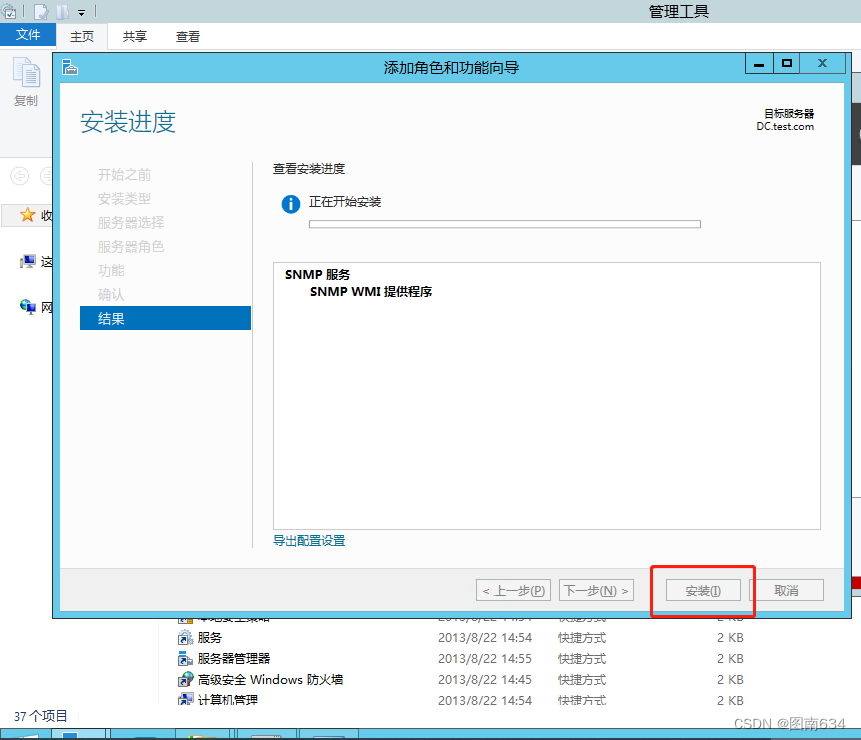
4、等待安装完成。

5,至此SNMP服务完成安装。


  • SNMP配置

配置 SNMP 社区和陷阱

  1. 单击“开始”,指向控制面板,指向“管理工具”,然后单击“计算机管理”。
  2. 在控制台树中,展开 服务和应用程序,然后单击 “服务”。
  3. 在右窗格中,双击 SNMP 服务
  4. 单击 “陷阱” 选项卡。
  5. 在 社区名称 框中,键入此计算机将向其发送陷阱消息的区分大小写的社区名称,然后单击 “添加到列表”。
  6. 在 “陷阱目标”下,单击 “添加”。
  7. 在 主机名、IP 或 IPX 地址 框中,键入主机的名称、IP 或 IPX 地址,然后单击 “添加”。

    主机名或地址显示在 “陷阱目标 ”列表中。

  8. 重复步骤 5 到 7,添加所需的社区和陷阱目标。
  9. 单击“确定”。

为社区配置 SNMP 安全性

  1. 单击“开始”,指向控制面板,指向“管理工具”,然后单击“计算机管理”。
  2. 在控制台树中,展开 服务和应用程序,然后单击 “服务”。
  3. 在右窗格中,双击 SNMP 服务
  4. 单击“安全”选项卡。
  5. 如果希望在身份验证失败时发送陷阱消息,请单击此复选框 (选中“ 发送身份验证陷阱 ”复选框) 。
  6. 在 “接受的社区名称”下,单击 “添加”。
  7. 若要指定主机如何处理所选社区中的 SNMP 请求,请单击 社区权限 框中所需的权限级别。
  8. 在 “社区名称” 框中,键入所需的区分大小写的社区名称,然后单击 “添加”。
  9. 指定是否接受来自主机的 SNMP 数据包。 为此,请执行下列操作之一:
    • 若要接受来自网络上任何主机的 SNMP 请求,无论标识如何,请单击 任何主机的“接受 SNMP 数据包”。
    • 若要限制接受 SNMP 数据包,请单击 这些主机的“接受 SNMP 数据包”,单击 “添加”,然后在 主机名、IP 或 IPX 地址 框中键入相应的主机名、IP 或 IPX 地址。
  10. 单击“添加”。
  11. 单击“确定”。

apache使用.htaccess文件实现屏蔽wget下载网站内容

经发现,虽然wget遵循 robots.txt 规则,但是那个还是可以绕过去,现在把我自己使用的屏蔽方法分享给大家:

1. 屏蔽下载任何文件

.htaccess

SetEnvIfNoCase User-Agent "^wget" bad_bot
<Limit GET POST>
  Order Allow,Deny
  Allow from all
  Deny from env=bad_bot
</Limit>


2. 屏蔽下载部分文件

.htaccess

SetEnvIfNoCase User-Agent "^Wget" bad_bot
SetEnvIfNoCase User-Agent "^Wget/1.5.3" bad_bot
SetEnvIfNoCase User-Agent "^Wget/1.6" bad_bot
<Files ~ "\.(html|pdf|mp3|zip|rar|exe|gif|jpe?g|png|php|jsp) $">
Order Allow,Deny
Allow from all
Deny from env=bad_bot
</files>


双网卡配置静态路由

方案按照内网走有线网口,外网走USB网卡。

按照以下顺序,之所以必须要这个顺序是写内网静态路由时候,接口ip可能不是有线网口ip,而是USB网卡,这会导致添加的静态路由失效。

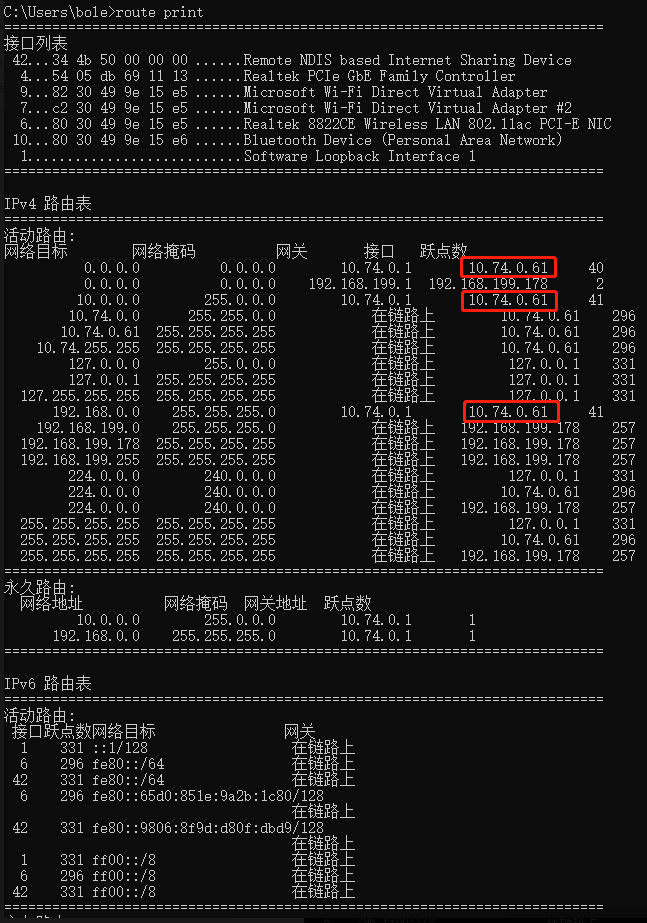
1、先插入有线网口,可以正常上网(假设获取ip为10.74.0.61)。先不插USB网卡。

添加内网静态路由:

route -p add 10.0.0.0 mask 255.0.0.0 10.74.0.61
route -p add 192.168.0.0 mask 255.255.255.0 10.74.0.61

route print 查看路由表。

2、插入USB网卡

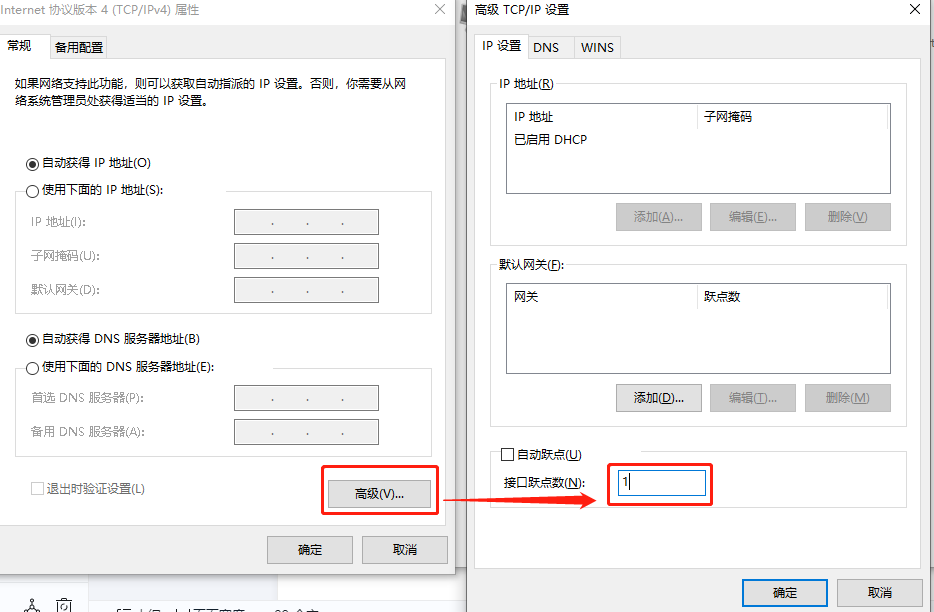
修改跃点数:

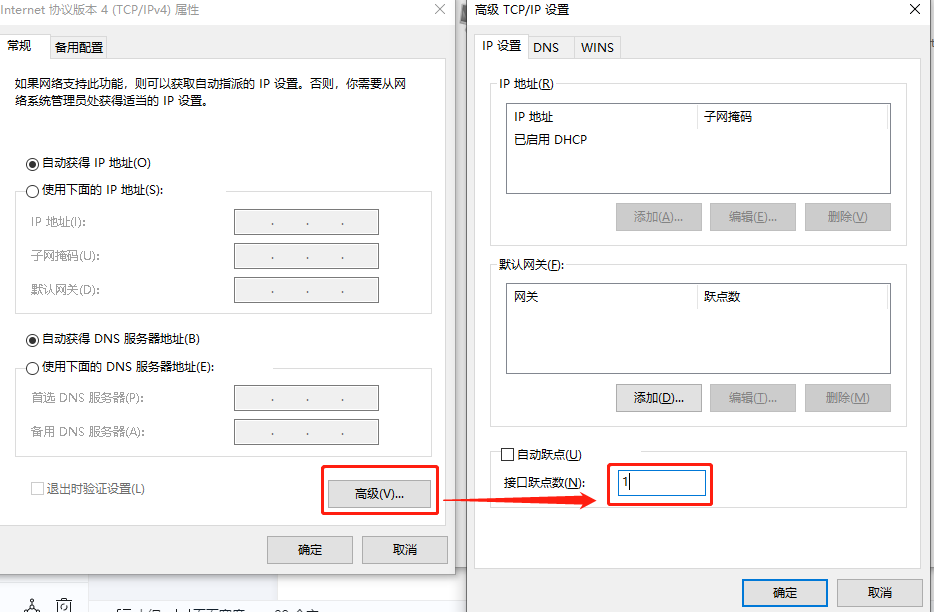
TCP/IPv4属性-高级-接口跃点数,修改跃点数为1。

配置完成。

这样静态默认路由USB网卡就会最高,所有流量会走USB网卡,但是因为之前配置了内网静态路由,所以内网还是走有线网口。

route print 查看路由表。


最后保证静态路由网关和接口是一个网段的就可以了。

SVN服务器搭建及配置

SVN安装与创建库:

 1  sudo apt install subversion
 2  sudo svnserve --version

 6  sudo mkdir /data
 7  sudo mkdir /data/svn
 8  sudo mkdir /data/svn/repository

10  sudo chmod -R 777 /data

12  cd /data/svn/
14  cd repository/
15  svnadmin create ./
17  sudo chmod -R 777 ./db/


44  mkdir PhoenixUnity
45  mkdir PhoenixUnityUI
46  mkdir PhoenixUnityAB
47  mkdir PhoenixUnityLibrary

49  svnadmin create ./PhoenixUnity
51  svnadmin create ./PhoenixUnityAB/
52  svnadmin create ./PhoenixUnityUI/
53  svnadmin create ./PhoenixUnityLibrary/


svnserve.conf配置文件:

修改

anon-access = none

auth-access = write

password-db = /data/svn/passwd   #指定用户密码文件

authz-db = /data/svn/authz    #指定权限文件

realm = PhoenixUnityAB

ubuntu@ubuntu:/data/svn$ cat PhoenixUnityAB/conf/svnserve.conf 
### This file controls the configuration of the svnserve daemon, if you
### use it to allow access to this repository.  (If you only allow
### access through http: and/or file: URLs, then this file is
### irrelevant.)

### Visit http://subversion.apache.org/ for more information.

[general]
### The anon-access and auth-access options control access to the
### repository for unauthenticated (a.k.a. anonymous) users and
### authenticated users, respectively.
### Valid values are "write", "read", and "none".
### Setting the value to "none" prohibits both reading and writing;
### "read" allows read-only access, and "write" allows complete 
### read/write access to the repository.
### The sample settings below are the defaults and specify that anonymous
### users have read-only access to the repository, while authenticated
### users have read and write access to the repository.
anon-access = none
# anon-access = read
auth-access = write
### The password-db option controls the location of the password
### database file.  Unless you specify a path starting with a /,
### the file's location is relative to the directory containing
### this configuration file.
### If SASL is enabled (see below), this file will NOT be used.
### Uncomment the line below to use the default password file.
# password-db = passwd
### The authz-db option controls the location of the authorization
### rules for path-based access control.  Unless you specify a path
### starting with a /, the file's location is relative to the
### directory containing this file.  The specified path may be a
### repository relative URL (^/) or an absolute file:// URL to a text
### file in a Subversion repository.  If you don't specify an authz-db,
### no path-based access control is done.
### Uncomment the line below to use the default authorization file.
# authz-db = authz
### The groups-db option controls the location of the file with the
### group definitions and allows maintaining groups separately from the
### authorization rules.  The groups-db file is of the same format as the
### authz-db file and should contain a single [groups] section with the
### group definitions.  If the option is enabled, the authz-db file cannot
### contain a [groups] section.  Unless you specify a path starting with
### a /, the file's location is relative to the directory containing this
### file.  The specified path may be a repository relative URL (^/) or an
### absolute file:// URL to a text file in a Subversion repository.
### This option is not being used by default.
# groups-db = groups
### This option specifies the authentication realm of the repository.
### If two repositories have the same authentication realm, they should
### have the same password database, and vice versa.  The default realm
### is repository's uuid.
# realm = My First Repository
### The force-username-case option causes svnserve to case-normalize
### usernames before comparing them against the authorization rules in the
### authz-db file configured above.  Valid values are "upper" (to upper-
### case the usernames), "lower" (to lowercase the usernames), and
### "none" (to compare usernames as-is without case conversion, which
### is the default behavior).
# force-username-case = none
### The hooks-env options specifies a path to the hook script environment 
### configuration file. This option overrides the per-repository default
### and can be used to configure the hook script environment for multiple 
### repositories in a single file, if an absolute path is specified.
### Unless you specify an absolute path, the file's location is relative
### to the directory containing this file.
# hooks-env = hooks-env
password-db = /data/svn/passwd

authz-db = /data/svn/authz

realm = PhoenixUnityAB
[sasl]
### This option specifies whether you want to use the Cyrus SASL
### library for authentication. Default is false.
### This section will be ignored if svnserve is not built with Cyrus
### SASL support; to check, run 'svnserve --version' and look for a line
### reading 'Cyrus SASL authentication is available.'
# use-sasl = true
### These options specify the desired strength of the security layer
### that you want SASL to provide. 0 means no encryption, 1 means
### integrity-checking only, values larger than 1 are correlated
### to the effective key length for encryption (e.g. 128 means 128-bit
### encryption). The values below are the defaults.
# min-encryption = 0
# max-encryption = 256


TortoiseSVN不能查看日志的原因之一

最近新建的svn项目,提交和获取一切都ok,就是上下文菜单中点击show log菜单时,不显示日志,也不能选查询日期。大家遇到的原因都不尽相同,查了一下,大致有如下几种原因:

1. 配置文件问题,原因是, anon-access 未设置成none,因为设置了帐号和权限, anon-access 是拒绝访问的,所以不能设置成读或者写,也不能不设置。我的原因,就是这个原因,

对比了项目的svnserve.conf文件,这几个地方是关键地方:

anon-access = none #这一项必须要有,且必须为none,不能不设置也不能设置成read或write
auth-access = write

password-db = ../../passwd #我的密码文件
authz-db = ../../authz #我的权限文件

realm = project #项目

修改之后重启svn服务

2. 有人说清除缓存,请除日志,也有人说上下文件菜单中选择Revision graph,但是执行这一项会卡在那里不动,估计还是上面第1条说的原因。

3. 也有人说可能是svn客户端版本的原因,这个也有可能。

可能各位遇到的情况都不太一样,可能还有别的原因。

配置svn 报错E200002解决办法

Minimal 版本的 CentOS 7安装后网络配置

CentOS 7 网络配置

Minimal 版本的 CentOS 7 安装完成后, 如果没有在安装过程中配置网络,那么安装成功后的系统是没有网络访问的.这是因为默认情况下,没有配置对应的 IP 以及 DNS 等导致的问题.此外,大部分 CentOS 是作为服务器存在的.为了方便使用,建议为 CentOS 配置静态 IP。

  1. 配置 CentOS 7 访问到网络.

    CentOS 安装成功后,进行一下 ping 的操作,验证网络是否联通.

    & ping 10.1.1.1
    

    当出现网络未联通的情况,我们使用 nmcli 命令查看一下网络设置:

    nmcli connection show
    

    该命令会返回 4 列数据. 分别是 NAME(联网代号), UUID(识别码), TYPE网卡类型, DEVICE(网卡名称).

    查看指定网卡的信息:

    nmcli connection show 联网代号
    

    这时候我们找到原因了. IP 和 DNS 配置都不正确.

    设置网络获取方式为自动获取 IP. 一般至此, 硬件连接成功的话都会连接到互联网上.

    nmcli connection modify 联网代号 connection.autoconnect yes ipv4.method auto
    
  1. 安装 ifconfig 工具

    CentOS 7 中使用 ip 命令代替了 ifconfig 命令, 如果你不习惯 ip 命令,可以将其安装回来.

    # yum install net-tools 
    
  2. 查看当前 ip 地址
    1. ip 命令查看当前 ip 地址

      # ip addr show
      
    2. ifconfig 查看当前 ip 地址

      # ifconfig
      
  3. 设置为固定 ip.

    修改网卡配置文件:

    # vi /etc/sysconfig/network-scripts/ifcfg-enp0s3 # 不同的网卡名臣可能不同
    

    已经配置为动态获取 ip 的配置:

    修改以下两个地方。注意:ip dns 等信息请于 ISP 处获取。

    • IPADDR = “[在这里输入你的静态 IP]”
    • GATEWAY = “[输入你的默认网关]”
    • NETMASK = “[输入你的网关]”
    • DNS1 = “[你的 DNS]”
    • DNS2 = “[你的 DNS]”

    使网卡配置生效

    nmcli connection up ens33
    

    重启网络服务。后查看 ip 是否与分配的相同。

    # service network restart
    # ip addr show
    

    ping 以下网络,检查网络连接状态。

    # ping -c4 www.baidu.com

https://www.jianshu.com/p/3e50e717a563

来源:简书