SS代理服务器端配置
使用shadowsocks及v2ray两种办法来实现
[scfc id=”scfctxt” title=”v2ray”]
v2ray:
该脚本已失效,用下边脚本。bash <(curl -L -s https://install.direct/go.sh)
curl -O https://raw.githubusercontent.com/v2fly/fhs-install-v2ray/master/install-release.shbash install-release.shwget http://www.laihp.top/ud/config.json apt purge curl unzip rm /usr/local/etc/v2ray/config.json cp config.json /usr/local/etc/v2ray/config.json service v2ray restart
config.json配置:
{
  "log" : {
    "access": "/var/log/v2ray/access.log",
    "error": "/var/log/v2ray/error.log",
    "loglevel": "warning"
  },
  "inbound": {
    "port": 12345,
    "protocol": "vmess",
    "settings": {
      "clients": [
        {
          "id": "84a34762-c1b2-4322-a831-3ad21cd09e05",
          "level": 1,
          "alterId": 64
        }
      ]
    }
  },
  "inboundDetour": [
    {
      "protocol": "shadowsocks",
      "port": 20001,
      "settings": {
    "method": "aes-256-cfb",
        "password": "v2ray",
        "udp": true
      }
    },
    {
      "protocol": "shadowsocks",
      "port": 20002,
      "settings": {
        "method": "aes-256-cfb",
        "password": "bole1234",
        "udp": true
      }
    }
  ],
  "outbound": {
    "protocol": "freedom",
    "settings": {}
  },
  "outboundDetour": [
    {
      "protocol": "blackhole",
      "settings": {},
      "tag": "blocked"
    }
  ],
  "routing": {
    "strategy": "rules",
    "settings": {
      "rules": [
        {
          "type": "field",
          "ip": [
            "0.0.0.0/8",
            "10.0.0.0/8",
            "100.64.0.0/10",
            "127.0.0.0/8",
            "169.254.0.0/16",
            "172.16.0.0/12",
            "192.0.0.0/24",
            "192.0.2.0/24",
            "192.168.0.0/16",
            "198.18.0.0/15",
            "198.51.100.0/24",
            "203.0.113.0/24",
            "::1/128",
            "fc00::/7",
            "fe80::/10"
          ],
          "outboundTag": "blocked"
        }
      ]
    }
  }
}
service v2ray restart[/scfc]
[scfc id=”scfctxt” title=”shadowsocks”]
shadowsocks:
安装pip
本教程使用Python 3为载体,因Python 3对应的包管理器pip3并未预装,首先安装pip3:
sudo apt install python3-pip安装Shadowsocks
因Shadowsocks作者不再维护pip中的Shadowsocks(定格在了2.8.2),我们使用下面的命令来安装最新版的Shadowsocks:
pip3 install https://github.com/shadowsocks/shadowsocks/archive/master.zip安装完成后可以使用下面这个命令查看Shadowsocks版本:
sudo ssserver --version目前会显示“Shadowsocks 3.0.0”。
创建配置文件
创建Shadowsocks配置文件所在文件夹:
sudo mkdir /etc/shadowsocks然后创建配置文件:
sudo nano /etc/shadowsocks/config.json复制粘贴如下内容(注意修改密码“password”):
{
    "server":"::",
    "server_port":8388,
    "local_address": "127.0.0.1",
    "local_port":1080,
    "password":"mypassword",
    "timeout":300,
    "method":"aes-256-cfb",
    "fast_open": false
}然后按Ctrl + O保存文件,Ctrl + X退出。
测试Shadowsocks配置
首先记录下服务器的IP地址
ifconfig找到IPv4地址(和IPv6地址),如我的ifconfig输出为
eth0      Link encap:Ethernet  HWaddr 46:91:89:4e:c1:52
          inet addr:138.68.51.55  Bcast:138.68.63.255  Mask:255.255.240.0
          inet6 addr: fe80::4491:89ff:fe4e:c152/64 Scope:Link
          inet6 addr: 2604:a880:2:d0::3727:7001/64 Scope:Global
          UP BROADCAST RUNNING MULTICAST  MTU:1500  Metric:1
          RX packets:102667 errors:0 dropped:0 overruns:0 frame:0
          TX packets:7869 errors:0 dropped:0 overruns:0 carrier:0
          collisions:0 txqueuelen:1000
RX bytes:151166937 (151.1 MB) TX bytes:1151476 (1.1 MB)所以我的IPv4地址是138.68.51.55,IPv6地址是2604:a880:2:d0::3727:7001。
然后来测试下Shadowsocks能不能正常工作了:
ssserver -c /etc/shadowsocks/config.json在Shadowsocks客户端添加服务器,如果你使用的是我提供的那个配置文件的话,地址填写你的IPv4地址或IPv6地址,端口号为8388,加密方法为aes-256-cfb,密码为你设置的密码。然后设置客户端使用全局模式,浏览器登录Google试试应该能直接打开了。
这时浏览器登录http://ip138.com/就会显示Shadowsocks服务器的IP啦!
测试完毕,按Ctrl + C关闭Shadowsocks。
本段shadowsocks摘自,以亲测可用:https://www.polarxiong.com/archives/Ubuntu-16-04%E4%B8%8BShadowsocks%E6%9C%8D%E5%8A%A1%E5%99%A8%E7%AB%AF%E5%AE%89%E8%A3%85%E5%8F%8A%E4%BC%98%E5%8C%96.html
[/scfc]
SS代理客户端配置与关闭
因按照流量收费,所以工作需要时打开使用,不需要时候关闭(Windows系统退出ss后一定要记得本地取消局域网代理)。(仅限在公司内可用)
Windows:Shadowsocks-2.5.8 |
Mac:ShadowsocksX-NG |
安卓: shadowsocks_2.1.1.apk下载 | shadowsocks_4.2.5.apk下载
iphone: Potatso/Potatso Lite从国区APP Store下架。感兴趣的自行Google(需要境外Apple账号,境外APP store市场下载)
打开SS代理:
解压后直接点击运行ss客户端即可。(更改为以下服务器信息,可能会定期变更)
服务器信息:
ip:*.*.*.*
port:20001
password:***
aes-256-cfb
关闭SS代理:
1、Mac系统退出打开的ss客户端即可。
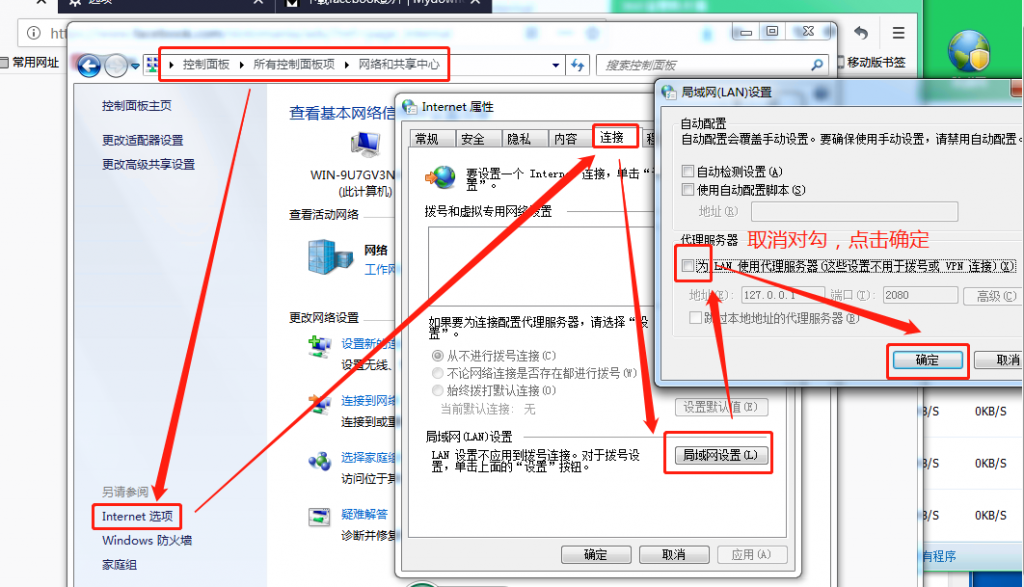
2、如果是Windows系统关闭ss客户端后,还需要按照下图所示,取消局域网代理。否则无法正常上网。点此使用脚本关闭可不用以下操作


You are a very bright person!